Drawing From
Mannequins /Mannikins

|

|
ELEMENTS OF ART:
A form has three dimensions, or appears to, when it is drawn on paper.
Value and shading adds to the feeling of three dimensions and contrast (one thing standing out against another) in art-making.
PRINCIPLES OF DESIGN:
Proportion: considering size ratios in parts to a whole. For example, How many heads tall is a body? Where is the halfway point of the body? How long is an arm and where does it end?
8 STUDIO HABITS OF MIND:
OBSERVE: Artists closely observe what is around them and draw exactly what they see
PERSIST: Artists persist even when something is challenging.
GOALS:
-Become familiar with the proportions of the human form in the simplified form of a wooden mannikin.
-Synthesize and apply knowledge of shape, form, shading and construction to a drawing from observation.
-Learn to draw closely from observation, using sighting and measuring.
PREPARATION: Reference (objects or photos to draw from)
Purchase a mannikin and pose it. Or, select photos.
Mannequins, or mannikins, are easy to find or order from any art store (or Amazon). Here is one source: mannikin to order
Using a mannikin is a great stepping stone to figure and character drawing skills! The simple wooden ones are best to start with.
Pose your mannikin in a humanly believable position that evokes emotion or has interesting action (must be school appropriate), view it from a 3/4 view. If you can't get hold of a mannikin, find several good 3/4 posed photos of mannikins that will work for you. An internet search for 'posed wooden mannikin' or 'wooden mannikin' may result in good photos. A 3/4 view shows an object partly from the front and partly from the side at the same time. This is the best view for making something look 3-D and interesting.
MANNEQUIN PART 1: In your sketchbook, make two detailed line drawings of a mannequin (no shading) exactly as described below:
DRAWING 1: Create a proportion drawing of a mannikin like the one below in your sketchbook.
In the video below the photo, the artist shares with you how to do this, in fact how to do it in three views (a 'turnaround'). You can just follow the video to complete the front view, as it shows you every step.
In summary:
-Measure out 8 equal sections vertically on your page.
-Draw the mannikin sections to fit, also getting the widths accurately. The video describes this as well.

DRAWING 2:
In your sketchbook, draw an interesting 3/4 pose of the mannikin from close observation of a mannikin or photo of a mannikin. A 3/4 view shows an object partly from the front and partly from the side at the same time. This is the best view for making something look 3-D and interesting.
-PREP: get your mannikin posed or reference photo on the computer in front of you. For ease, either one will be called 'mannikin.'
-Turn to a new sketchbook page and draw a light, rulered border.
-Observe your mannikin. Which way is it leaning, bending, curving? If you drew the head as an oval and the whole torso from one arm through the body to one leg in one continuous line, what would the line look like? If you added on the other arm and leg as a line, what would they look like? Now draw those lines, very lightly, on your page. Your mannequin must fill the page.
-Sight and measure with your pencil to help guide you in proportions. The video below shows how.
-Take some time to Observe your mannikin or photo again without drawing it. What do you notice about the the shapes and lines and forms? What do you notice about the the positive and negative space? Find the cylinders, spheres and boxes, or distorted versions of them, in the mannikin, as you learned in form construction. Lightly draw the shapes and forms that you observe.
-Refine your drawing. Similar to the drawing on the right below (do not use the same pose or copy the drawing), draw the outlines, joints and the inner details of your mannikin. If you use weighted line (line that gets thick where parts are closer or darker and thin where the areas are lighter or farther) it will look even more 3-D and can create a three-dimensional feel to your drawing,
Sighting and Measuring Video: How to sight and measure when drawing from observation |
EXAMPLE: (Do not copy the example) Mannikin Line Drawing in 3/4 View 
|
HAND IN: PHOTOGRAPH your mannikin proportion line drawing and 3/4 line drawing and put on one slide. Make sure your hand-written name and the date is included with the drawing in your photograph. Put in correct headers and in to all three locations.
MANNEQUIN PART 2: Emotive Pose with shading and background that relates to the pose. Start with practice sketch:
DRAWING 1: Make a PRACTICE SKETCH in a half-page drawing in your sketchbook.
-PREP: get your reference ready: Pose the mannikin or find a very good, detailed photo of one in an interesting, emotive pose, that also shows strong darks and lights in how it is lit. Pose must be in 3/4 view.
-In your sketchbook, draw a border-box that is half page size.
-Observe your mannikin or photo. What do you notice about the the shapes and lines and forms? Look at the positive and negative space. Find the cylinders, spheres and boxes in the mannikin, as you learned in construction Use sighting and measuring to help you.
-Sketch the mannikin inside the box. A sketch is a rougher drawing, not quite so detailed, that is made from observation but not as detailed as a final drawing.
-Come up with a background idea that matches the pose and sketch it also. The background is the environment you imagined for the mannikin. Locate reference photos of skies, walls, trees to help you draw the background.
-Put first/last name and date neatly and legibly at bottom of drawing in order to receive credit..
DRAWING 2: Make a FINAL DRAWING, with shading, on a separate paper.
PREP:
-Locate the correct final drawing paper provided in your portfolio - 12 inches tall by 9 inches wide, thin, white drawing paper.
- You must know what you plan to draw and have shown it roughly in your sketch, first.
- Set out your reference photos, mannikin, and sketch in front of you. Observe all, simultaneously, as you do your final.
- Make a light, rulered border.
BEGIN:
- Closely observe your reference. Very lightly, lightly sketch/map out your final drawing of the mannikin and background while observing BOTH the original reference photos, mannikin, and your sketch at the same time.
-Map out each thing in light lines to make sure you have arranged it to fit, but do not shade anything until the entire mannikin and background is mapped out.
-Look over your drawing and reflect. Could you improve some of the lines? Shapes? Clean up the drawing as you need.
-Once you are ready to shade, use all of your art pencils, sharpener, blender and eraser to do so, using the overhand grip and the side of your pencil. Shading needs to show at least five values (five levels of dark and light).
COMPLETE:
-Reflect and adjust: does anything need a little more polished drawing? Any smudges or not-using lines need to be erased?
Final drawing needs to be clean - have NO crossouts, wrinkled paper and so on - to receive credit, so take care of your work.
-Neatly write first/last name and date at bottom of drawing to receive credit.
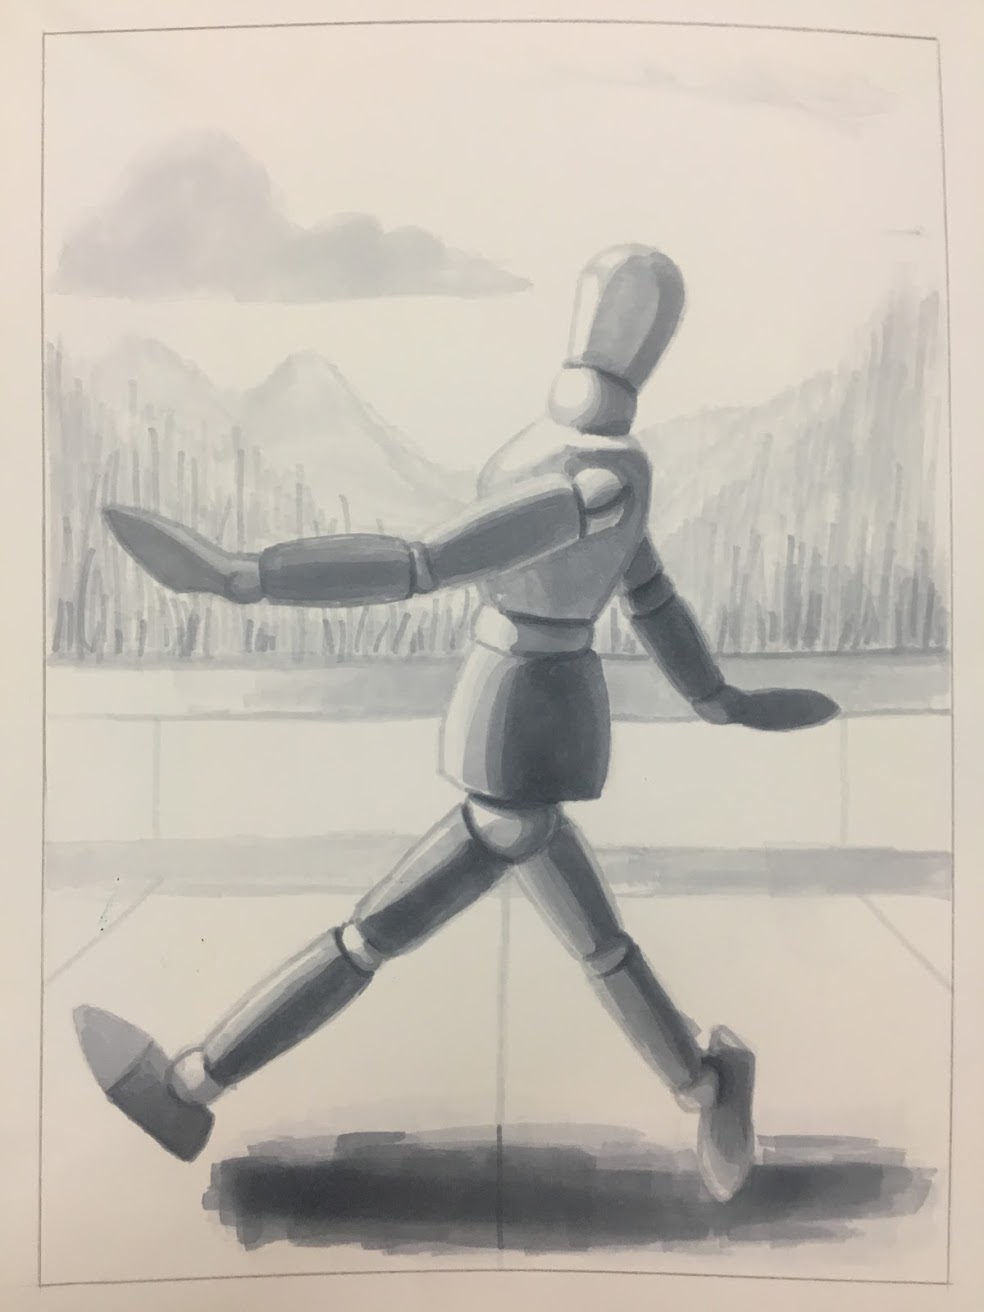
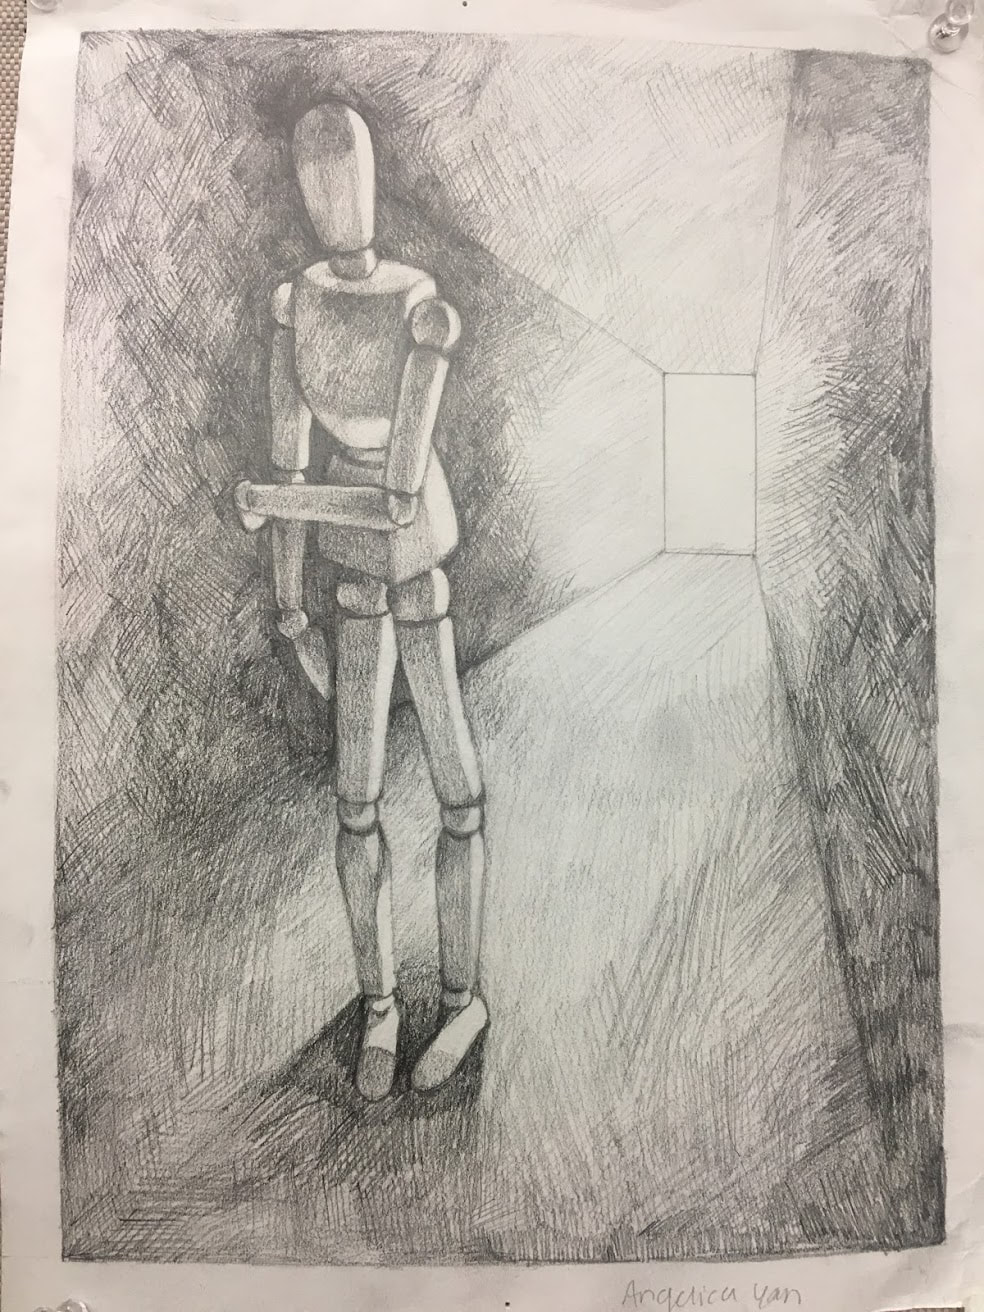
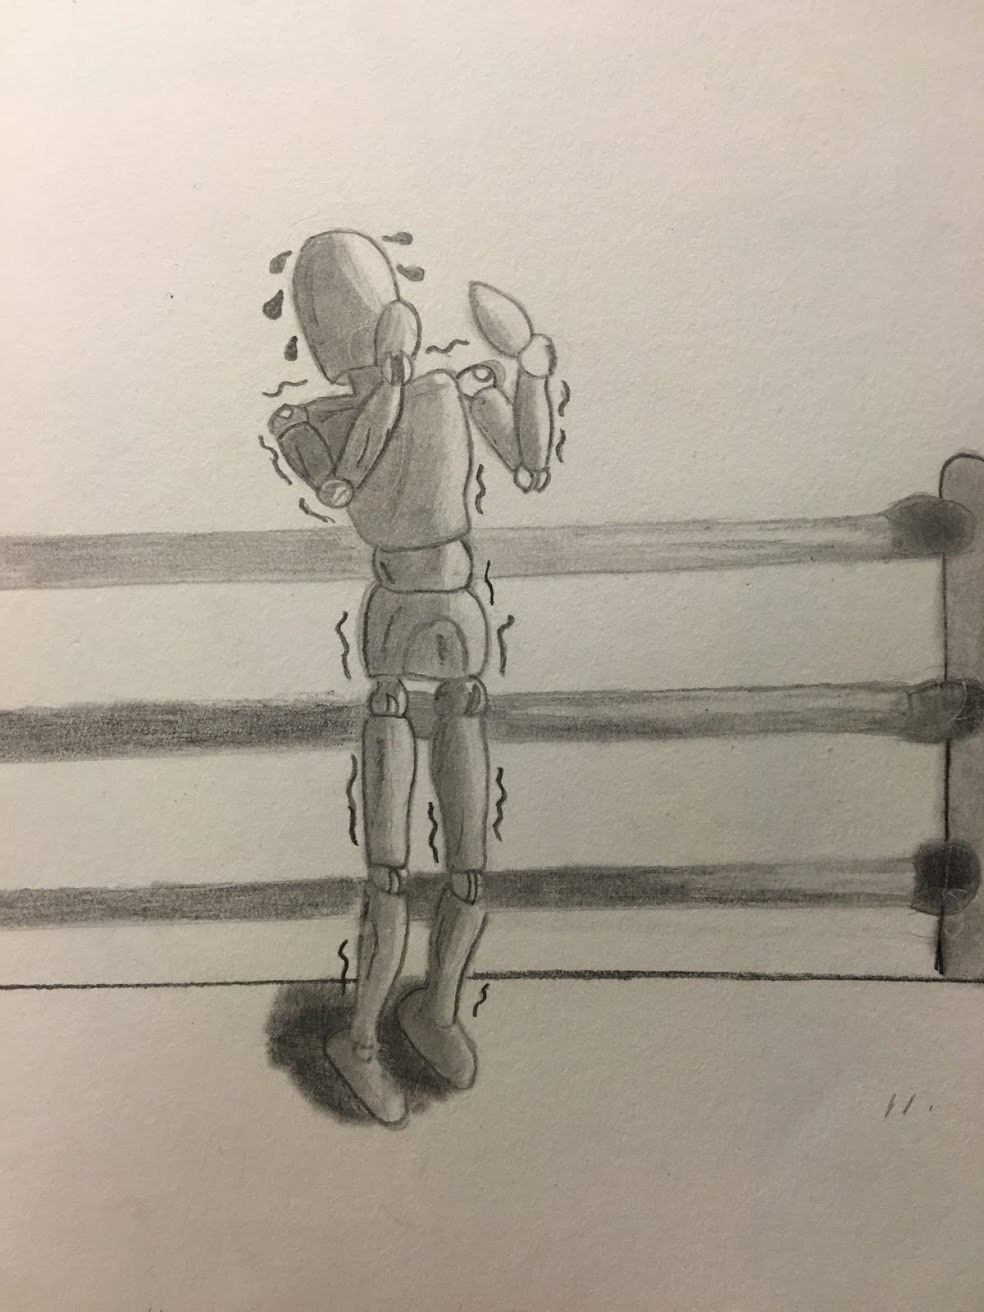
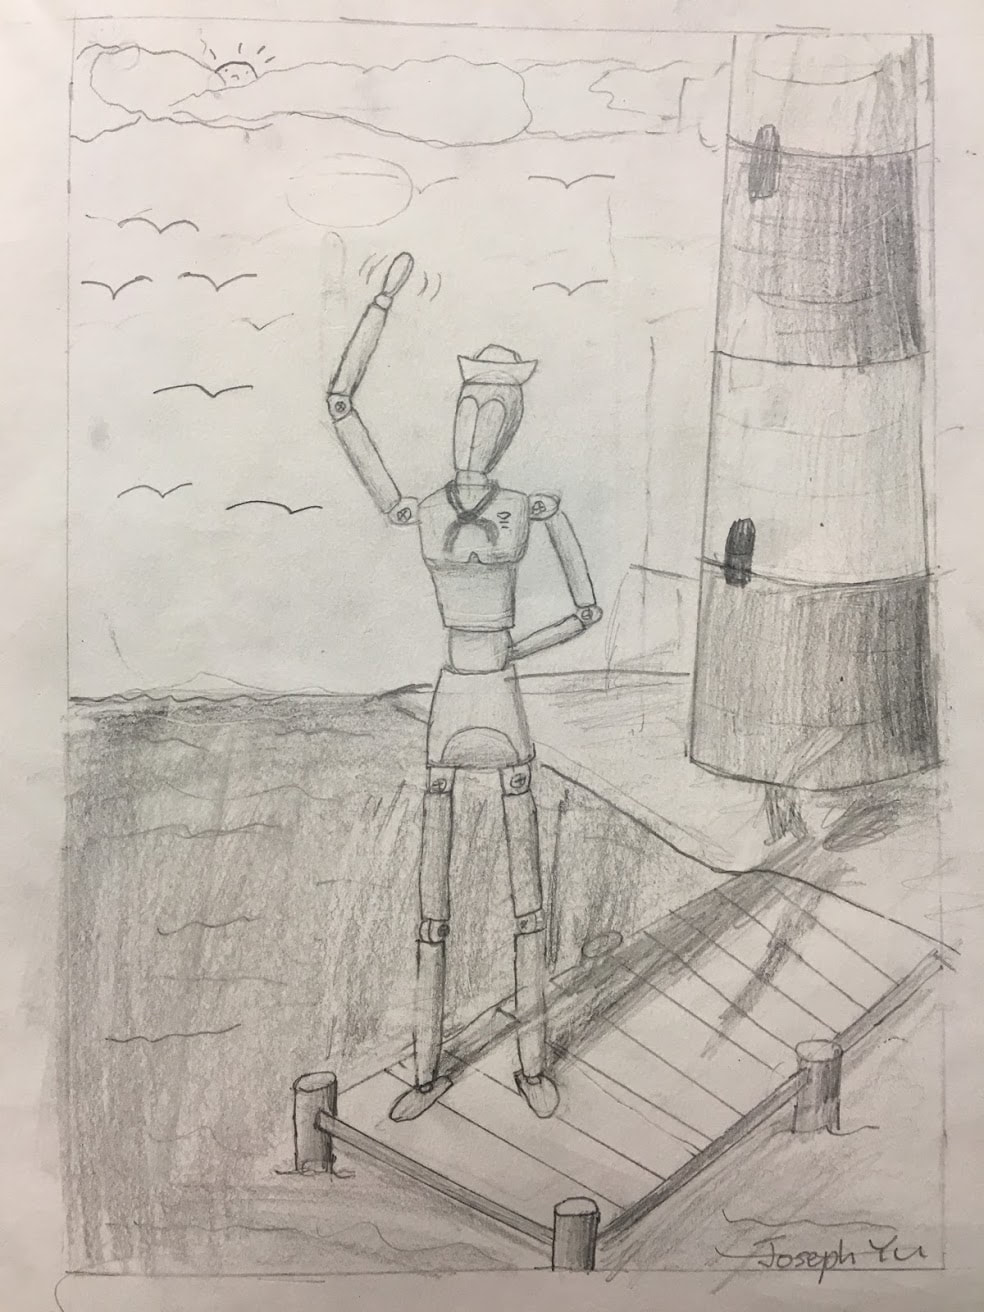
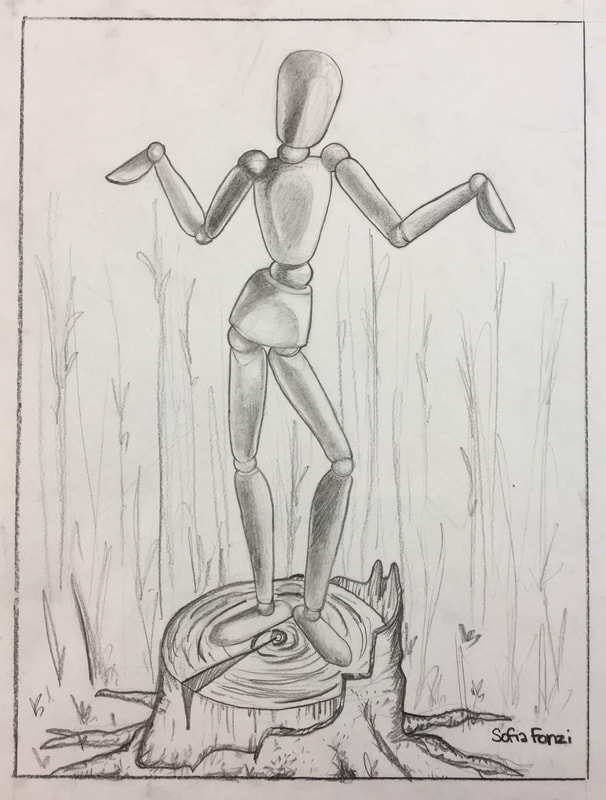
EXAMPLES: (Do not copy the example; these are only to give you an idea)
DRAWING 1: Make a PRACTICE SKETCH in a half-page drawing in your sketchbook.
-PREP: get your reference ready: Pose the mannikin or find a very good, detailed photo of one in an interesting, emotive pose, that also shows strong darks and lights in how it is lit. Pose must be in 3/4 view.
-In your sketchbook, draw a border-box that is half page size.
-Observe your mannikin or photo. What do you notice about the the shapes and lines and forms? Look at the positive and negative space. Find the cylinders, spheres and boxes in the mannikin, as you learned in construction Use sighting and measuring to help you.
-Sketch the mannikin inside the box. A sketch is a rougher drawing, not quite so detailed, that is made from observation but not as detailed as a final drawing.
-Come up with a background idea that matches the pose and sketch it also. The background is the environment you imagined for the mannikin. Locate reference photos of skies, walls, trees to help you draw the background.
-Put first/last name and date neatly and legibly at bottom of drawing in order to receive credit..
DRAWING 2: Make a FINAL DRAWING, with shading, on a separate paper.
PREP:
-Locate the correct final drawing paper provided in your portfolio - 12 inches tall by 9 inches wide, thin, white drawing paper.
- You must know what you plan to draw and have shown it roughly in your sketch, first.
- Set out your reference photos, mannikin, and sketch in front of you. Observe all, simultaneously, as you do your final.
- Make a light, rulered border.
BEGIN:
- Closely observe your reference. Very lightly, lightly sketch/map out your final drawing of the mannikin and background while observing BOTH the original reference photos, mannikin, and your sketch at the same time.
-Map out each thing in light lines to make sure you have arranged it to fit, but do not shade anything until the entire mannikin and background is mapped out.
-Look over your drawing and reflect. Could you improve some of the lines? Shapes? Clean up the drawing as you need.
-Once you are ready to shade, use all of your art pencils, sharpener, blender and eraser to do so, using the overhand grip and the side of your pencil. Shading needs to show at least five values (five levels of dark and light).
COMPLETE:
-Reflect and adjust: does anything need a little more polished drawing? Any smudges or not-using lines need to be erased?
Final drawing needs to be clean - have NO crossouts, wrinkled paper and so on - to receive credit, so take care of your work.
-Neatly write first/last name and date at bottom of drawing to receive credit.
EXAMPLES: (Do not copy the example; these are only to give you an idea)
|
|
|
|
|
HAND IN: PHOTOGRAPH your practice sketch and final, shaded mannikin drawing and put on one slide. Make sure your hand-written name and the date is included with the drawing in your photograph. Put in correct headers and in to all three locations. Keep all your original photos saved for the critique.
